Building Azure Networks using Terraform
In my last post we talked about using Terraform to create Azure infrastructure. As part of that post we created an Azure resource. If you missed that, you can review it here.
In this article we are going to build out some Azure networking, VNets, Subnets and network peering. As with the previous article, we will be using Terraform to deploy these network resources.
Hopefully you’ll have a code editor and Terraform installed on your system. If not, to get them installed, whiz on over to this article here.
A brief caveat: The approach I’m using to deploy resources within Azure using Terraform is how I do it. Having spoken to numerous people about best practice or guidance around how I should work with Terraform the consensus seems to be, use whichever method works for you. So, armed with that advice, here goes 😊
What are we going to build?
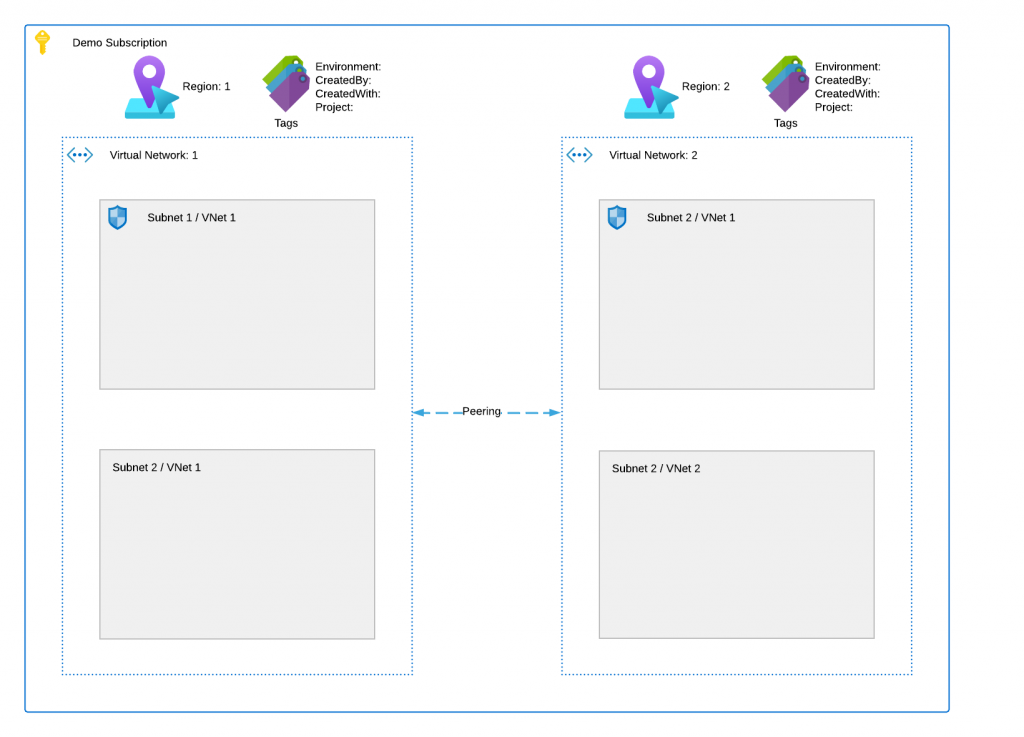
In this article we are going to create the following resources in Azure using Terraform:
- 2 x Resource Groups
- 2 x Virtual Networks
- 4 x Subnets
- 1 x Virtual Network Peer
- 2 x Network Security Groups (NSG)
- Resource Tags
The image below shows a high-level overview of the deployment.

The Terraform code used for this lab can be found in my GitHub here. The files in the repo are used to do the following:
- main.tf – Used to specify providers and create the resource groups
- variables.tf – Used to define variables for this deployment. They are defaults and referenced using the terraform.tfvars file.
- terraform.tfvars – This is file the only file you’ll need to edit amend parameters for your deployment.
- output.tf – This file will be used will be used to capture the randomly generated name of the Resource Group for future deployments that need to reference the name of this resource group.
- vnets.tf – This file builds the virtual networks and subnets
- peerings.tf – This file creates the peering between the two virtual networks
- nsg.tf – This file creates the network security group and assigns it to the subnets
Lets get building
1. Resource Groups – For this lab, we are going to need two Resource Groups. The main.tf file is were these will be created. The file is available in GitHub, link above. You can also use the code below.
terraform {
  required_providers {
    azurerm = {
      # Specify what version of the provider we are going to utilise.
      source        = "hashicorp/azurerm"
      version       = ">= 2.90.0"
    }
    random = {
      source        = "hashicorp/random"
      version       = "3.1.0"
    }
  }
}

provider "azurerm" {
  features {}
}

# Create random string - This will create a random character string to be used for naming of resources
resource "random_string" "rg_random_1" {
  length  = 4
  special = false
}

# Create random string - This will create a random character string to be used for naming of resources
resource "random_string" "rg_random_2" {
  length  = 4
  special = false
}

# Create Resource Group 1
resource "azurerm_resource_group" "rg_1" {
  name     =  "${var.rg_name_1}-${var.region_1}-${random_string.rg_random_1.result}"
  location = var.region_1
  tags = {
    Environment = var.tag_environment
    CreatedBy   = var.tag_createdby
    CreatedWith = var.tag_createdwith
  }
}

# Create Resource Group 2
resource "azurerm_resource_group" "rg_2" {
  name     =  "${var.rg_name_2}--${var.region_2}-${random_string.rg_random_2.result}"
  location = var.region_2
  tags = {
    Environment = var.tag_environment
    CreatedBy   = var.tag_createdby
    CreatedWith = var.tag_createdwith
  }
}
2. Virtual Networks – Next, we are going to create two Virtual Networks in the resources groups we’ve created above. The file is available in GitHub, link above. You can also use the code below.
# Create VNet 1
resource "azurerm_virtual_network" "vnet_1" {
  name                = "${var.vnet_1}-${random_string.rg_random_1.result}"
  location            = var.region_1
  resource_group_name = azurerm_resource_group.rg_1.name
  address_space       = [var.address_space_region_1]
  dns_servers         = [var.dns_server_1, var.dns_server_2, var.dns_server_azure]
  tags = {
    Environment = var.tag_environment
    CreatedBy   = var.tag_createdby
    CreatedWith = var.tag_createdwith
    Project     = var.tag_project
  }
}

# Create VNet 1 Subnet 1
resource "azurerm_subnet" "vnet_1_snet_1" {
  name                 = "${var.snet_1}-${var.vnet_1}-${random_string.rg_random_1.result}"
  resource_group_name  = azurerm_resource_group.rg_1.name
  virtual_network_name = azurerm_virtual_network.vnet_1.name
  address_prefixes     = [var.address_vnet_1_snet_1]
}

# Create VNet 1 Subnet 2
resource "azurerm_subnet" "vnet_1_snet_2" {
  name                 = "${var.snet_2}-${var.vnet_1}-${random_string.rg_random_1.result}"
  resource_group_name  = azurerm_resource_group.rg_1.name
  virtual_network_name = azurerm_virtual_network.vnet_1.name
  address_prefixes     = [var.address_vnet_1_snet_2]
}

# Create VNet 2
resource "azurerm_virtual_network" "vnet_2" {
  name                = "${var.vnet_2}-${random_string.rg_random_2.result}"
  location            = var.region_2
  resource_group_name = azurerm_resource_group.rg_2.name
  address_space       = [var.address_space_region_2]
  dns_servers         = [var.dns_server_1, var.dns_server_2, var.dns_server_azure]
  tags = {
    Environment = var.tag_environment
    CreatedBy   = var.tag_createdby
    CreatedWith = var.tag_createdwith
    Project     = var.tag_project
  }
}

# Create VNet 2 Subnet 1
resource "azurerm_subnet" "vnet_2_snet_1" {
  name                 = "${var.snet_1}-${var.vnet_2}-${random_string.rg_random_2.result}"
  resource_group_name  = azurerm_resource_group.rg_2.name
  virtual_network_name = azurerm_virtual_network.vnet_2.name
  address_prefixes     = [var.address_vnet_2_snet_1]
}

# Create VNet 2 Subnet 2
resource "azurerm_subnet" "vnet_2_snet_2" {
  name                 = "${var.snet_2}-${var.vnet_2}-${random_string.rg_random_2.result}"
  resource_group_name  = azurerm_resource_group.rg_2.name
  virtual_network_name = azurerm_virtual_network.vnet_2.name
  address_prefixes     = [var.address_vnet_2_snet_2]
}
3. Peering – Once we have our virtual networks created, we are going to peer them together. This will allow hosts in either virtual network to talk to each other. To do this we will use the peerings.tf file The file is available in GitHub, link above. You can also use the code below.
# Create VNet peering VNet 1 to 2
resource "azurerm_virtual_network_peering" "peer-1-to-2" {
  name                         = "peer-${var.vnet_1}-to-${var.vnet_2}"
  resource_group_name          = azurerm_resource_group.rg_1.name
  virtual_network_name         = azurerm_virtual_network.vnet_1.name
  remote_virtual_network_id    = azurerm_virtual_network.vnet_2.id
  allow_virtual_network_access = true
  allow_forwarded_traffic      = true
}
resource "azurerm_virtual_network_peering" "peer-2-to-1" {
  name                         = "peer-${var.vnet_2}-to-${var.vnet_1}"
  resource_group_name          = azurerm_resource_group.rg_2.name
  virtual_network_name         = azurerm_virtual_network.vnet_2.name
  remote_virtual_network_id    = azurerm_virtual_network.vnet_1.id
  allow_virtual_network_access = true
  allow_forwarded_traffic      = true
}
4. Network Security Group – Now that we have our resource groups, vnet’s, subnets and peering created, we are going to create and apply a network security group a subnet. Also, seeing as in future we will be deploying virtual machines into these vnet’s we will need access to administer them. This file will also capture your external IP address and allow access from that IP address to the subnet on RDP (TCP/3389) and SSH (TCP/22). Kudos and thanks to my good friend Jake Walsh for that neat little trick.
# Get your IP address
data "http" "clientip" {
  url = "https://ipv4.icanhazip.com/"
}

# Create Network Security Group Region 1
resource "azurerm_network_security_group" "nsg_1" {
  name                = "nsg-${var.vnet_1}-${var.snet_1}"
  location            = var.region_1
  resource_group_name = azurerm_resource_group.rg_1.name

  security_rule {
    name                       = "RDP-In"
    priority                   = 100
    direction                  = "Inbound"
    access                     = "Allow"
    protocol                   = "*"
    source_port_range          = "*"
    destination_port_range     = "3389"
    source_address_prefix      = "${chomp(data.http.clientip.body)}/32"
    destination_address_prefix = "*"
  }

  security_rule {
    name                       = "SSH-In"
    priority                   = 101
    direction                  = "Inbound"
    access                     = "Allow"
    protocol                   = "*"
    source_port_range          = "*"
    destination_port_range     = "22"
    source_address_prefix      = "${chomp(data.http.clientip.body)}/32"
    destination_address_prefix = "*"
  }

  tags = {
    Environment = var.tag_environment
    CreatedBy   = var.tag_createdby
    CreatedWith = var.tag_createdwith
    Project     = var.tag_project
  }
}

# Create Network Security Group Region 2
resource "azurerm_network_security_group" "nsg_2" {
  name                = "nsg-${var.vnet_2}-${var.snet_1}"
  location            = var.region_2
  resource_group_name = azurerm_resource_group.rg_2.name

  security_rule {
    name                       = "RDP-In"
    priority                   = 100
    direction                  = "Inbound"
    access                     = "Allow"
    protocol                   = "*"
    source_port_range          = "*"
    destination_port_range     = "3389"
    source_address_prefix      = "${chomp(data.http.clientip.body)}/32"
    destination_address_prefix = "*"
  }

  security_rule {
    name                       = "SSH-In"
    priority                   = 101
    direction                  = "Inbound"
    access                     = "Allow"
    protocol                   = "*"
    source_port_range          = "*"
    destination_port_range     = "22"
    source_address_prefix      = "${chomp(data.http.clientip.body)}/32"
    destination_address_prefix = "*"
  }

  tags = {
    Environment = var.tag_environment
    CreatedBy   = var.tag_createdby
    CreatedWith = var.tag_createdwith
    Project     = var.tag_project
  }
}

resource "azurerm_subnet_network_security_group_association" "nsg_vnet_1_snet_1" {
  subnet_id                 = azurerm_subnet.vnet_1_snet_1.id
  network_security_group_id = azurerm_network_security_group.nsg_1.id
}

resource "azurerm_subnet_network_security_group_association" "nsg_vnet_2_snet_1" {
  subnet_id                 = azurerm_subnet.vnet_2_snet_1.id
  network_security_group_id = azurerm_network_security_group.nsg_2.id
}
Deploying the code
Once you have your files in your Terraform directory you can go ahead and deploy the code. To do this, open your editor of choice and browse to your Terraform directory.
1. Once you are in your Terraform directory, run the following command to initialise the Terraform deployment and download the required modules.
terrafrom init2. Next we need to create a Terraform plan. This is used to determine what is required to create the configuration you have specified in your Terraform directory. To do this, run the command below.
terraform plan -out main.tfplan3. Now that you have generated your Terraform deployment plan, we can push the Terraform code into Azure and create our resources. Run the command below to apply your code.
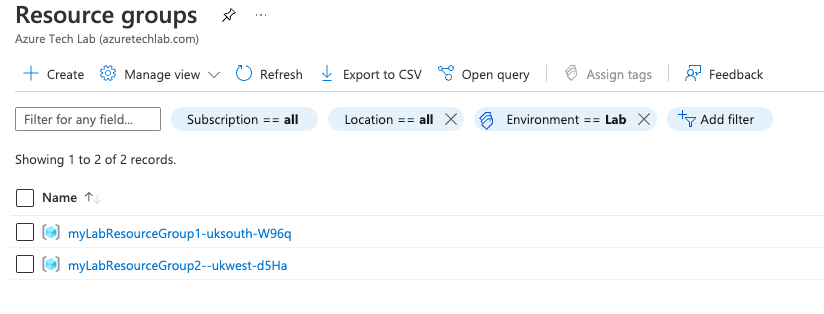
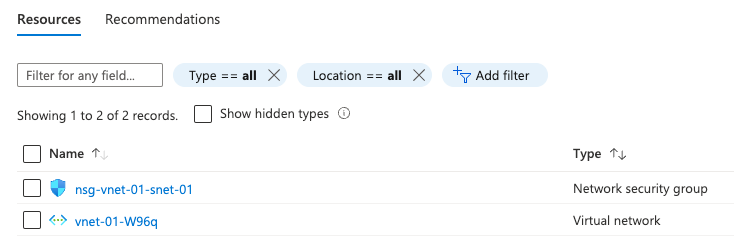
terraform apply main.tfplan4. That’s it, you have now deployed your resource groups, virtual networks, subnets, peerings and network security groups. If you have a look in the Azure portal you will see the two resource groups you created. Within each resource group you will see a vnet and a nsg.


5. Now that you have successfully deployed your resources into Azure, once you have finished with them, it’s time to clean it up and remove your deployment. This is quite straightforward, simply run the command below. This will use the .tfstate file and destroy all resource that terraform built using the apply command previously.
terraform destroySummary
I hope that this very short blog post about getting started with building network resources in Azure using Terraform has been helpful? I think that the more you use this toolset to deploy infrastructure into Azure, the more you will appreciate its power and simplicity. In my next blog, we’ll build upon this one and add more services into the resource group. Next time, its building Azure Keyvault 😊
