Deploying WordPress Application using Visual Studio Team Services and Azure – Part two
This post is the second part of two blog posts describing how to setup a CI/CD pipeline using Visual Studio Team Services (VSTS) for deploying a Dockerized custom WordPress website working with Azure WebApp for Containers and Azure Database for MySQL. In Deploying WordPress application using Visual Studio Team Services and Azure – part 1 we described how to build a Continuous Integration (CI) process using VSTS, while in this part we are going to focus on the Continuous Delivery (CD) part by using the VSTS Release management.
Prerequisites for this part
- MySQL client installed on Azure Virtual Machine (apt-get install mysql-client-5.7).
- Allow the connectivity between the Azure VM machine to Azure Databases for MySQL
- Installing this VSTS Route Traffic extension
Visual Studio Team Services – Release phase
I recommend on saving after completing each of the following steps:
First, we need to create a new empty release definition, go to releases, click on the + icon and choose create release definition, select empty process as the template.

Let’s start by adding artifacts to our pipeline. Click on add in the Artifacts section (step 1), a right blade will be presented, choose the following:
- Source type – Build
- Project – The relevant project name
- Source – The name of the build definition we created
- Default version – Latest
- Source alias – Keep the default
After clicking on Add, click on the trigger icon under the Artifacts section (step 2), a right blade will be shown, choose to enable the continuous deployment trigger.
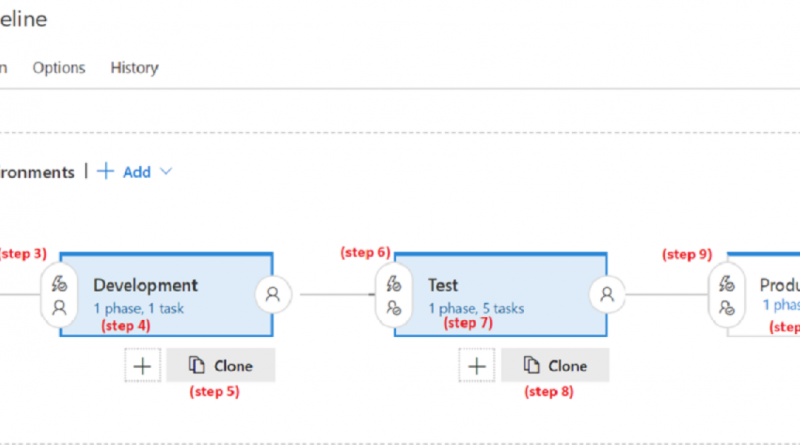
We need to move to configure the environments section, click on pre-deployment conditions icon (step 3), select After release trigger and close the right blade.
Next step is adding tasks to the development pipeline, either click on the link (step 4) or click on tasks.
Development Pipeline
Under tasks tab, click on agent phase and select hosted Linux preview as agent queue. Add the following tasks by clicking the + icon:
- Three SSH command tasks
- One Azure App Service deploy task
- One Azure App Service Manage task

Now, we need to add variables that we going to use during the development CD process. Click on the variables tab and start adding from the below list, select development as the scope:
- $(destappinsight) –Application Insight Instrumentation Key of Dev environment
- $(desturl) – App Service URL of Dev environment
- $(migrationfile) – temp file name when executing DB backup and restore operation
- $(mysqldestdb) – DB name of Dev environment
- $(mysqlhost) – Server name of Azure Database for MySQL
- $(mysqlpass) – Password for Azure Database for MySQL
- $(mysqlport) – The Port for Azure Database for MySQL
- $(mysqlsourcedb) – DB name of Local environment
- $(mysqluser) – User name for Azure Database for MySQL
- $(resultfile) – temp file name when executing DB backup and restore operation
- $(sourceappinsight) – Application Insight Instrumentation Key of Local environment
- $(sourceurl) – Local environment URL
It’s possible to use a more secure solution for storing sensitive values, read more about using Azure KeyVault to store sensitive values and use them in VSTS.
Before returning to the tasks tab, we need to add a new SSH endpoint (Settings/Services/New Service Endpoint/SSH). Fill your Azure Virtual Machine details.

Now, let’s go back to the tasks tab and start editing the tasks.
The 1st SSH task is backup DB to file with the following values:
SSH endpoint – select the relevant SSH endpoint
Run – Commands
Commands –
mysqldump -P $(mysqlport) -h $(mysqlhost)  -u $(mysqluser)  -p$(mysqlpass) $(mysqlsourcedb) > $(resultfile)
The 2nd SSH task is replace values with the following values:
SSH endpoint – select the relevant SSH endpoint
Run – Commands
Commands –
sed 's/$(sourceurl)/$(desturl)/g;s/$(sourceappinsight)/$(destappinsight)/g' $(resultfile) > $(migrationfile)
The 3rd SSH task is restore DB from migrated file with the following values:
SSH endpoint – select the relevant SSH endpoint
Run – Commands
Commands –
mysql -h $(mysqlhost) -u $(mysqluser)  -p$(mysqlpass) $(mysqldestdb) < $(migrationfile)
The 4th task is Azure App Service Deploy version 3 with the following values
Azure subscription – select the relevant Azure subscription
App type – Linux Web App
App Service name – select Dev environment App Service
Image Source – Container Registry
Registry or Namespace – Azure Container Registry login server value
Image – The Docker image name from CI process
Tag - $(Build.BuildId)
App settings –
-DB_ENV_NAME $(mysqldestdb) -DB_ENV_USER $(mysqluser) -DB_ENV_PASSWORD $(mysqlpass) -DB_ENV_HOST $(mysqlhost)
The 5th task is Azure App Service Manage, restart Azure App Service with the following values:
Azure subscription – select the relevant Azure subscription
Action – Restart App Service
App Service name - select the App Service of Dev environment
We have completed building the development CD pipeline.
Test Pipeline
Go back to pipeline tab, highlight development environment and choose to clone the environment (step 5), call the new environment test.
As Pre-deployment conditions of test environment (step 6), select after environment trigger, enable the pre-deployment approvals option, choose a member of your team as a approver to initiate the deployment process for test environment.
After closing the blade, click on the link below to view environment tasks (step 7).
The tasks tab will be presented, no need to update the first three SSH tasks.
The 4th task – update the App Service name to the correct App Service for test environment.
The 5th task – update again the App Service name.
Go to variables tab, filter according to test scope and set the variables values to test environment. We have now completed building the test CD pipeline.
Learn more about the implementation option that can create task groups and use it between different environments.
Production Pipeline
Our goal is to have a production rollout without any downtime to achieve that we will use the slot mechanism and routing capabilities that Azure App Services are offering.
To create the production environment, repeat the same steps for creating the test environment (steps 8, 9 and 10).
Go to the variables tab, filter according to production scope and set the values to production environment. Set the value of $(mysqldestdb) to stage DB. In addition, add a new variable $(mysqlproddb) and set the value to production DB.
Go back to tasks tab, update the App Service name for the 4th and 5th tasks, this time check the deploy to slot option and choose ‘staging’ slot which we created for the production App Service.
Add additional tasks by clicking the + icon:
- One Route Traffic task – Select Production App Service, stage slot and route 100% of the traffic (see below screenshot)
- Two SSH command tasks – same configuration as other SSH tasks just different command
1st task Command:
mysqldump -P $(mysqlport) -h $(mysqlhost) -u $(mysqluser) -p$(mysqlpass) $(mysqldestdb) > $(resultfile)
2nd task command:
mysql -h $(mysqlhost) -u $(mysqluser) -p$(mysqlpass) $(mysqlproddb) < $(resultfile)
- One Azure App Service deploy task
Same as 4th task but this time without checking the slot option - One Azure App Service Manage task
Same as 5th task but this time without checking the slot option - One Route Traffic task
Select Production App Service, stage slot and route 0% of the traffic
We have completed building the CD for Production. See the result:

Summary
In this series of two blog posts, I hope you had a chance to experiment how easy is to get started with building modernize DevOps processes by adopting Docker, start using Visual Studio Team Services (VSTS) as your CI/CD tool and Azure as the cloud provider. This kind of modernization can be the first step towards deployment transformation of any organization.
Resources
Source: Azure Blog Feed