Ingesting a data stream from NIST manufacturing lab data – Part 2
The Industry Experiences team has recently published a solution guide for extracting insights from existing IoT data. The solution consists of the following components.
- Ingesting data
- Hot path processing
- Cold path processing
- Analytics clients
This is the second part to a series of blogs that go through those components in detail. Ingestion of data is divided into two parts. This is part 2, where we cover the component that transforms the raw data then posts data records to Azure Event Hubs. For more information, see Creating a data stream from NIST manufacturing lab data – Part 1.
Communication between two microservices
The question is how to make the communication work between the Logic App component and the custom code that transforms the raw data and posts the resulting data records to Event Hubs. Each data record type such as events and samples are received by different Event Hubs.
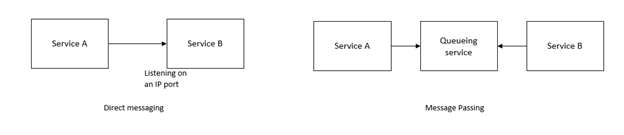
Let’s start with the communication mechanism. We can talk about two general ways for communication between microservices, direct messaging or networking communication, and message passing.

The best practice is to decouple microservices using message passing. The microservice on the receiving end of the message waits for messages to arrive and process them. This method also allows multiple servers processing one queue, enabling easy scalability.

For this project we use the Azure Queue storage service (Storage queues). Since we are using Storage queues, the component transforming the raw messages must poll the queueing service for new messages and process them.
The transform and post component
Custom code transforms the incoming raw result in XML into a flat structure for the data records. The record is a set of name-value pairs, with timestamps.
To extract the timestamps, use this MTConnect client found on GitHub. You can also use install the library as a NuGet package. Note that the library targets.NET standard 2.0.
The component polls the queue service to retrieve messages. Azure WebJobs SDK simplifies this task by providing a declarative binding and trigger system that works with storage blobs, queues and tables. The SDK also controls queue polling.
Azure Functions Host allows hosting custom code targeting the Azure WebJobs SDK. The code can run in different environments. In this case, we use a Docker container to host the function code, and the Docker container is hosted by Azure Container Instances.
Azure Functions Core Tools is used to continue with the rest of the implementation. Note that we use Version 2.x. Once the tools are installed, run the func new command with the desired options for language, name and function to generate a stub method. Run the func templates list command to see supported templates, then select Queue trigger.
WebJob example code
The following is the main entry method. In the attributes, FunctionName tells the host that this is a WebJobs function. Next comes the triggers and the bindings. The code is triggered when there is a message on smssamples queue. That is followed by the bindings to read and write data on various targets. There are three bindings for Event Hubs as destinations. There an input binding for an Azure Blob, and output bindings for three Azure Storage tables. The name of the blob is retrieved from the contents of the message. The C# attribute argument streams/{queueTrigger} specifies that the name of the blob is in the message contents. For details, see Azure Blob storage bindings for Azure Functions.
[FunctionName("FlattenAndPost")]
public static async Task Run(
     [QueueTrigger("smssamples", Connection = "queueConnectionString")]
     string myQueueItem,
     TraceWriter log,
     ExecutionContext context,
     [EventHub("samplesEventHub", Connection = "smssamplesEventHub")]
     IAsyncCollector<string> asyncSampleCollector,
     [EventHub("eventsEventhub", Connection = "smsEventsEventHub")]
     IAsyncCollector<string> asyncEventCollector,
     [EventHub("conditionsEventhub", Connection = "smsConditionsEventHub")]
     IAsyncCollector<string> asyncConditionCollector,
     [Table("eventsfromfunction", Connection = "queueConnectionString")]
     IAsyncCollector<EventTableRecord> asyncEventTableCollector,
     [Table("samplesfromfunction", Connection = "queueConnectionString")]
     IAsyncCollector<SampleTableRecord> asyncSampleTableCollector,
     [Table("conditionsfromfunction", Connection = "queueConnectionString")]
     IAsyncCollector<ConditionsTableRecord> asyncConditionTableCollector,
     [Blob("streams/{queueTrigger}", FileAccess.Read)]
     Stream blobStream)
Once the blob is read, we can then use the MTConnect Client library’s object model. The DeserializeResults method uses the XMLSerializer to deserialize XML into an object. See Using the XMLSerializer for more details.
var sampleResult = DeserializeResults<MTConnectStreamsType>(blobContents);
Following that, the code processes events, samples and conditions through separate functions that basically do the same operation. That is, we use LINQ to project the hierarchy to a flat structure and write to the bindings.
var nonEmptyEvents = sampleResult.Streams.Where(
         s => s.ComponentStream != null
              && s.ComponentStream.All(cs => cs.Events != null && cs.Events.Any()))
     .ToList();

events = nonEmptyEvents.SelectMany(
     s => s.ComponentStream.SelectMany(
         cs => cs.Events.Select(
             e => new EventRecord()
             {
                 HourWindow =
                     new DateTime(
                         e.timestamp.Year,
                         e.timestamp.Month,
                         e.timestamp.Day,
                         e.timestamp.Hour,
                         0,
                         0),
                 Id = Guid.NewGuid().ToString(),
                 DeviceName = s?.name,
                 DeviceId = s?.uuid,
                 Component = cs?.component,
                 ComponentName = cs?.name,
                 ComponentId = cs?.componentId,
                 EventDataItemId = e?.dataItemId,
                 EventTimestamp = e?.timestamp,
                 EventName = e?.name,
                 EventType = e.GetType().Name,
                 EventSequence = e?.sequence,
                 EventSubtype = e?.subType,
                 EventValue = e?.Value
             }))).OrderBy(r => r.EventSequence).ToList();
Also note, the Event Hubs bindings are not installed by default and you need to reference the required libraries (Microsoft.Azure.WebJobs.Extensions.EventHubs) from NuGet.
With this setup, you should be able to run the function locally as described in the Azure Functions Core Tools.
Running in a Docker container
Let’s see how to bring this code into a Docker container. The Dockerfile is straightforward, except for a few notes.
- Take a dependency on the microsoft/azure-functions-dotnet-core2.0 container image.
- Make sure the workdir is /app.
- Setting ASPNETCORE_ENVIRONMENT to Development allows you to test and debug while you are building the solution. That needs to be either removed, or flipped to Production once the component is deployed
- Set the AzureWebJobsScriptRoot environment variable to /app/bin/Debug/netstandard2.0/.
- Copy the values in local.settings.json file as environment variables.
- Check that there is no space around “=” when setting the environment variables.
FROM microsoft/azure-functions-dotnet-core2.0
WORKDIR /app
ENV ASPNETCORE_ENVIRONMENT="Development"
ENV AzureWebJobsScriptRoot=/app/bin/Debug/netstandard2.0/
ENV AzureWebJobsStorage="…"
ENV AzureWebJobsDashboard="…"
ENV queueConnectionString="…"
ENV smssamplesEventHub="…"
ENV smsEventsEventHub="…"
ENV smsConditionsEventHub="…"
ENV consoleLoggingMode=always
COPY . .
Build the new Docker container as usual, register the new container image to the Azure Container Registry, and then run it as described in the tutorial.
Next steps
- Clone the sample repo.
- Build cool solutions with Azure functions using Azure Functions Core Tools.
Source: Azure Blog Feed